1/31/17

January Blog Ending and 2017 BlogTrending

As January 2017 ends, another milestone begins for me personally and for this blog...CollectInTexasGal.  Yes, it was a milestone birthday for me this month, and as HiHoney pointed out, "You are now out of your 60's". 

Wow!  I've always been a 60's Gal.  In high school in 1961-1965.  A 60's Oldies but Goodies music listener and BeBopper.

 Such great memories...why I even dedicated 2015's AtoZ April Challenge to those memories.
In my heart, I'll always be a 60's Gal.
 My first January blogging here on CollectInTexas Gal was in 2010, and although it has changed in appearance many times, CollectInTexas Gal has been what is now known as an 'Old School Blog'. 
~photos from post...The Planner for 2010~
Yep, blogging has changed and according to 2017 Blogging Trends and Predictions, blogging as I know and write it...has gone from Journaling and Joining to Business and Buzzfeeders.  Did you know we should no longer call ourselves bloggers?  The replacement terms is 'Business Owner'.
 
 It seems many major blogs are turning off  their comments and instead of conversation via comments...it's all about social platforms like Facebook and Twitter.  Then there is the traffic jam on phones and tablets where on the 'Go'ers' can blog in a hurry and zip through their Blog List of non- commenting and packed Ads. 
For Me...I guess I'll just have to hang with 'Old School Blogger'!
Now, don't get me wrong....I like change, and can easily be called the 'Queen of Design Change'!
That is how I'll be Trending in 2017.
PS...Comments Welcome!

1/28/17

Colonial Wool to Cyber Cotton


Valentines Day is only a few weeks away and it's not to soon to be thinking about the Sweethearts in your life.  As a matter of fact, I am reminded of my 'One True Love' throughout the year with the empty heart shaped box of chocolates.  It is the center piece of a collection of hearts.  So, it is fitting that it takes center stage in the photos of a craft of my Colonial American ancestors...rag rugs.

My colonial 5x great grandmother Mary Polly choices of materials were limited to wool and flax.  After hours of spinning, braiding and stitching, her rag rugs covered the floors of her colonial log cabin.  What I would give for one of her rag rugs.  It is well known that rag rugs often become family heirlooms and are passed from one generation to another.  I like to think Mary Polly's early American descendants were also rag rug makers and included my ancestors who were part of the westward movement during the late 1800's.  That is when my 2x great grandparents came to Texas.  In the frontier days rag rugs were made of recycled worn clothing, wool blankets and homespun cotton.
 
Along with rag rugs...HEARTS have endured as a popular theme for generations for not just Valentines Day, but for expressing love of hearth and home with quotes like...
Home Sweet Home!
Home is where the heart is!
When there is LOVE in the HOME...there is JOY in the HEART!
The Kitchen is the Heart of the Home!
 
I wonder what my Colonial and Frontier Great Grandmothers
would think of today's Cyber Love Cotton Hearts!
For Reals!
 
Linking to

1/26/17

Round and Oval Rag Rugs and Baskets Show

What can I say but....Hey...January has been Round and Oval Rag Rug and Basket month!


1/23/17

Hymnal History Lesson at The Church In The Wildwood

It has been quite some time since I veered off the highway to take a country road with the promise of an old cemetery at the end.  Did just that last weekend....not once but twice.

Both cemeteries proved to be a lesson in history dating back to the mid 1800's.  None of my ancestor names were found, but never the less,  there were some familiar Texas family names and headstones that caught my eye.

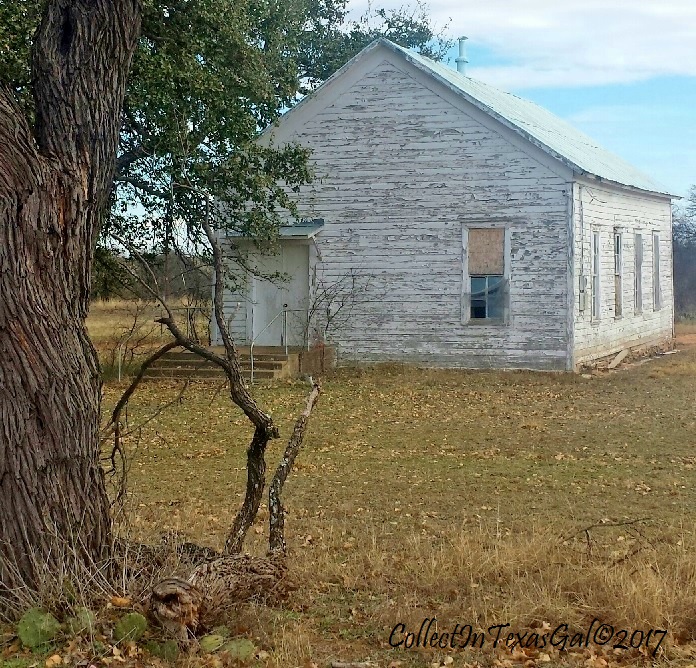
It is always a bonus to find a country church as part of a cemetery.  And as you can see, an opportunity for a photo shoot.  I never pass up looking through windows or even checking the doors. 
You never know what is waiting for you through the broken glass and torn screen.
Strains of Rock of Ages and The Old Rugged Cross immediately came to mind as I looked through the broken glass at the sunlight streaming through the window.  It was as if the church pianist had just finished playing 'Abide With Me' as the congregation filed out the front door.  I had to get a better look at the open song book...expecting to see a familiar closing hymn...I was surprised when from the sunlit window the pages revealed....
"Open your hymnal to page 114 and stand as we sing Still, Still With Thee".  Again, my mind was filled with memories of standing beside my mother and sharing a song book.  She had a lovely singing voice.  Did you know Still, Still With Thee was written by Harriet Beecher Stowe?  I did not, until I looked it up.  She was the daughter of Rev. Lyman Beecher, President of Lane Seminary in Cincinnati, Ohio.  She was married to Rev. Calvin E. Stowe a professor of Languages and Biblical Literature.  She authored several other hymns as well as the classic book Uncle Tom's Cabin.

The other two hymns showing were not ones I remembered, and could only make out the title of the one on the right...The Church In The Wildwood. 

Now, if Harriet Beecher Stowe's history lesson was new to you, too, then get ready to be amazed at the story behind 'The Church In The Wildwood.

It was composed in 1857 by a young music teacher named William S. Pitts on a visit to Bradford, Iowa.  Already for me there are two notables for my family history...Pitts (a short version of my maiden name Pittman) and Iowa (state of my birth and home of my mother's families).

Although the song was not published for many years after it was written and set to music, it was the inspiration for the 'Little Brown Church' built in the exact spot that had inspired it's author to compose the song.    Pitts and his singing class from Bradford Academy sang the song at the dedication of the new brown church in 1864.

After the church closed in 1888 due to an economic downturn in Bradford, the Society for the Preservation of the Little Brown Church was founded.  In the 1890's the song was popularized by two evangelists as well as groups of traveling singers throughout the country in the 1920's and 30's.  As the song grew in popularity, the church has become a popular tourist spot, and remains so today.  Every year it attracts thousands of visitors to see or be married in the little brown church in the vale.

True, this little church is not brown...not in Iowa, but, it certainly is
The Church In The Wildwood
Click HERE for The Church In The Wildwood sung by
The Original Carter Family from the 1920's.
Click HERE for Still, Still With Thee sung by the Altar of Praise Men's Chorale. 
Come to the church in the wildwood,
Oh, come to the church in the dale,
No spot is dear to my childhood,
As the little brown church in the vale.

1/18/17

My Brainiac Bric-a-brac

Bric-a-brac refers to lesser 'objets d'art'  which form collections of curios.  The term is thought to be of French origin and became popular during the Victorian era.

I'm pretty sure my collection of bric-a-brac used as containers in the studio are more curious than curios.  I can say, some of them are 'objets d'art' since I made them while teaching a coil clay pottery class.  Made as a 'demo' and glazed with an unlabeled bottle of under glaze...imagine my surprise when it came out of the kiln.

My students dubbed it 'Brainiac'.  Their coil pots also would forever be Brainiacs, too.   I wonder how many have survived...the pots...that is. 

Like many things made over the years, 'Brainiac' found it's way to my Studio as a sewing tool catch all.  I hardly notice or think about it's likeness to a brain anymore...until it turns up in a photo shoot of all the bric-a-brac containers that hold a slew of more bric-a-brac.
I am sure you know as a collector/user of sewing/quilting/knitting/crocheting/crafting tools and supplies...how important it is that those tools be handy, organized and visually present.  After all, how can they be of use if they are hidden away and forgotten in a drawer.  Not that I don't have a drawer or two of tools less used or ready for backup.
It's one thing to have collection of curios curious bric-a-brac tool holders, but yet another to make containers/holders for the bric-a-brac tool holders.  That is exactly what I find myself doing with rag baskets.
My goodness, but they are handy, perfect for organizing
and are visually present and pleasing.
They are 'No Brainer-Brainiacs' !

1/12/17

Salem Ruler and Olfa Cutter = Round Rag Rug Rolls

Quilters Tools Rule!   Of all the lessons learned as a quilter, 'Rotary Cutting 101' has been the most valuable and most used in practically every fabric project I undertake.

For sure it is the #1 time saver in Rag Rug making.  That is due to my preference for clean edges and exact sizes of strips as opposed to raveled/stringy edges and approximate sizes when strips are torn. 

I'm picky that way, and I'm a 'NeatNick' when it comes to craftsmanship. 
So it goes to say that making the most of saving time begins with cutting strips...lots of strips.

I select fabrics from my Rag Rug Stash based on color, print and weight (some fabrics are stiffer/heavier). 

Once I have filled a sizeable basket with a batch of rolls, I am ready to coordinate them for a rug.  More often than not, I end up back in the stash for one or two blenders like the solid green and blue in the rug now on my worktable. 
I like working in the round and with each round rug, I figure out something that makes it easier, more time efficient and improvements to craftsmanship.  For instance the starting circle...instead of forming a loop with a knot...wrap the fabric around the crochet hook leaving an inch and half tail...take it to the sewing machine and stitch across the strip to form a loop to fit the hook.  So much less bulky and easier to make the beginning circle.  I chain 4...join in 1st chain...chain 1...single crochet in circle 8 times catching and covering the tail in the first few single crochet...NO KNOT!  In round 2...2 single crochet in back loop of each of the 8 single crochet.

Here are a couple of Round Rag Rugs from a Basket Batch of
Salem Ruler and Olfa Cutter Rolls.

1/10/17

Comfort Zone Color Combo Notes and Theories


Note taking has changed over the years.  I am/was an Old School Big Chief Tablet note taker.  Well, maybe not that old school, but old enough to know that paper and pencil notes are invaluable when your head is filled with details you may need later.  These days, I'm feeling pretty Hi-Techie with my note taking Tablets.  It's the best of both worlds...the old and the new.  
 
I still rely on a spiral notebook to record the details...especially if it's a new project.  Often I will include fabric swatches, who it was made for, costs of materials and time it took to make.

Now, as for the other tablet, it's the 'Bomb' or my 'Jam'...as they now say rather than my old standbys...neat and cool.  It truly is an invaluable tool with it's quick access to any and everything imaginable...including Pinterest....my go to Notebook!

For this post, I am referring to my Color Combo Board on Pinterest and how I use it for color selections....in and out of my 'Comfort Zone.

My 'Comfort Zone' is a balanced and coordinated composition.  I approach most projects whether they be quilts, jewelry, clothing, or in this case rag rugs, in this traditional mode.

For me it is innate...or a built in way of putting together colors.  Here's how I roll with it.  First I choose a 'Focus' fabric with multiple colors.  To that I combine as many coordinating colors as I need for the project...in this rug  it was 4 plus the popper...black.  Then, in the making, the transition of color changes and number of rows are balanced and as seamless as possible.

Out of my 'Comfort Zone', is the 'Scrappy/Random' method of putting together colors.  I have to say that in many instances the finished project turns out to be my favorite. 

Although it looks quite random, there are some color rules I can't help but follow.  Mostly choosing lights and darks appropriately and making transitions for a blended look. 

Over the many years of working with color theories and understanding how and why I pick and choose the way I do, I can truly say....I'm pretty much always...
 In My Color Comfort Zone!

1/7/17

Rag Rug Weigh In

Putting a value on handmade items is one of the most difficult decisions the maker/artist/craftsman has to make.  Regardless of what one pays for the materials or the investment in tools or even the cost of maintaining a studio space, it comes down to what the target market will allow.  For many it comes down to making a sale or sitting on the product and waiting for that one in one hundredth buyer.

Sometimes it's not that the targeted consumer doesn't admire and want the rag rug...for instance...it's their comparison chart that often makes or breaks the sale.  First, they think "I can buy that at Wherever-Mart for much less...it's going to get walked on for Pete's sake". 

Then there is the shopper like me..."I can make that myself".  Oh, really?  You are going to go home or go shopping for the fabrics, sharpen or buy the assortment of cutting tools, find the right size crochet hook, set up sewing machine...all that before you can start on the rug.  Then there is sizing, cutting and sewing strips together and rolling them into a workable and efficient form...see Swifting and Sewing Scrap Strips. Yay! finally ready to start making that rug...and it's only been how many hours, days, weeks to get to this point?  Yeah, I shoulda bought it!

As it happens, that one in one hundredth shopper who is willing to pay the 'It's Worth' price, had a grandmother who made rag rugs, or recognizes the quality of the materials and craftsmanship.  And regardless of whether they could go home and make it themselves, knows the TIME it takes to create this one of a kind rug that will last forever...maybe become a 'Family Heirloom.

A sale like that gives me a great sense of heartfelt satisfaction, but...it doesn't...as they say..."pay the bills".  So how do I arrive at a target market value...I WEIGH it!

Here is a 'Rule of Thumb' weigh in for Rag Rug fabric...
6 yards...stripped and rolled = 1.5 pounds
6 yards fabric...averaged price of $5 yard = $30
'Rule of Thumb' size and weight of Rag Rugs...
24"x36" Oval = 3 pounds 
36" Round = 3.5 pounds
24"x 36" Rectangle = 3.5 pounds
Obviously, the smaller or larger the rug,
the adjustment of yardage affects the cost of materials. 
And then there is the TIME!
And that, too, depends on how...'You Weigh It In'.
 
Linking to

1/5/17

Rag Rug, Time and the Karma Effect

My Aunt Georgia was a Rag Rug maker, too.  I say too since I am one as well, and learning of Georgia's rag rug making struck me as more than a mere coincidence.  The whole time I was making a rag rug for Georgia's son and his wife, I thought about Georgia and what I remembered about her...which didn't include rag rugs.  She was my Mother's sister-in-law from Iowa, a farmers wife, a teacher, mother of my 3 cousins and a visitor to Texas several times.  Those visits I remember through the pictures of their vacations to Texas...which were several topics in The 2015 AtoZ April Challenge "Growing Up In The 1950's and 1960's.
 
 Mother's Iowa Farmer Brothers and their families came for a visit in 1957.  It was definitely several days of Kodak moments for her...judging by the number of pictures taken as she took them on the 'Texas Oil Boom Zone' tour.

This group of 'Shoebox' photos also gives me the opportunity to include them as Letter Z...which is a bit of a reach, but nevertheless an interesting look at the Texas Mid-Century Oil & Drilling Bidnezz.

As indicated in this photo of my Uncles, having a 'Pump Jack' in your backyard was not all that unusual, and regardless of the warning signs and the threat of a whoppin',  kids of all ages could not resist climbing on the iron horse for a whooping good ride.

From Letter D - Dad and Sixteen Hands Dan
Annie Oakley I was not.  About the only trick riding I did was keeping my seat while riding bareback.
Dad's first rule if one wanted to ride or give rides, was 'Get On and Off on Your Own'.  So, here's **Sixteen Hands Big Dan and 'All Legs Barefoot Sue' whose longest reach could not get a handful of Dan's White Palomino Mane.  Even if I could have, Dad nor anyone else would give me a boost. 
      My cousin from Iowa...the one wearing Dad's black Stetson...tried, but threw me over Dan's back. Getting off was easier...we just slid off his golden tail behind.
 
While working on the rug, the idea that there was more to this 'Family Rag Rug' coincidence and the timing that brought it about kept nagging at my 'I Believe In Karma' self. 

You know, the spiritual principle of cause and effect where intent and actions of an individual influence the future.  Yeah...that Good Karma!

The feeling of Karma was so strong it led me to Ancestry, my Family Tree and to Georgia's profile.

Don't you just love the picture of her from I'm guessing, the 1960's-70's.  Love those cat eye glasses and the pin on her collar.  She's just as I remembered her with that sweet smile...always friendly and happy to see us when we visited Iowa.  I can hear her Iowa accent and pleasant laugh still today.  All that from a quick look at her picture...it's one of the things I so appreciate about being a Family Historian and Ancestry member. 

Just knowing we are both Rag Rug makers is a special connection, but still there has to be more why at this TIME the 'Karma Effect' has emerged.  And there it is!!!!!
Georgia
Birth April 19, 1915 
Death January 6, 1993
Today, January 5, 2017, twenty-four years after her death, I boxed up the Rag Rug I made for her son and his wife along with a packet of portrait photos.  Photos Mother had saved of Son receiving Rag Rug and this one...
I believe in Karma.  If the good is sown, the good is collected.
When positive things are made, that returns well. Yannick Noah
Thank-you Aunt Georgia...I loved the TIME spent with you...the yesterdays and todays!

1/3/17

Swifting & Sewing Scrap Strips...A Tutorial

You have heard the saying "Necessity is the Mother of Invention"...right?  I'm pretty sure that was the basis for the invention of the 'Swift/Skein Holder' by some guy whose arms and hands went numb after hours of holding up a hank of yarn while his wife wound the yarn into a ball.  Of course it was worth it when the said yarn ball was knitted into socks and gloves.

Just in case you are unfamiliar with the Swift, here's a swift synopsis...it is a tool used to hold a hank of yarn while being wound into a ball.  It has an adjustable diameter so that it can hold different sizes of hanks and rotates around a central rod. 

Generally made of wood or metal unless you have a vintage one made of whale ivory...highly collectible and if ever you find one...swiftly swift that Swift up!

Swifts are not used very much in the textile/fabric industry, but more so by knitters and crocheters.  As you know I am multi-fiberist...one who does both textiles/fabric and yarn/string/thread/ whatever.  That is how I came to own a Swift...the yarn to whatever stuff, and I certainly do appreciate having it since my hank holder husband falls asleep from boredom.  When not in use...the swift...not husband...is sheathed in it's cover...much like the sleeping husband...and is mounted on the sewing work table just waiting for the next hank of yarn.  Needless to say, I am not into hanks of yarn right now, but I am in NEED of something to wind yards and yards of fabric strips into a nice neat roll...like a quilters jelly roll.  So, here comes the Mother of Invention.

TaDa...the 4T-SSR...short for...ToiletTubeTubTop Swift Strip Roller.
Here are the steps to making one...just in case you don't want to wait for mine to be patented, produced and marketed. 
Materials....1 toilet tube (without toilet paper); 1 round plastic lid (best if lid has a raised rim, but not imperative).  Step 1.  Mark and cut out circle for tube in the center of lid.  Step 2.  Hot glue tube to lid on top and underneath with an inch or so of the tube sticking out on the under side.  Step 3.  Slide the tube/lid over top of Swift and secure with clips.   Now you are ready to ROLL!!!  So, Let's Roll!!!
 
Before we roll, we first have to ready the strips.  Here I have cut all the strips I will need for a 24x36 rag rug...approximately 14 yards of 7 different fabrics.  Each strip is cut 1.75 inches by 2 yards.

Each bundle is tagged with strips linear yardage so I know about how many rounds the roll will make as the rug progresses.  After a few times of cutting and rolling, I can pretty much estimate how far it will go and not have to tag.
Next, set your stitch length to the smallest length...usually your default setting...on mine it is 2.2

Open your strip bundle and separate the 2 strip lengths matching and overlapping the 2 ends.  Set one strip length to your left and the other to your right. 

They will hang over each side of your lap to the floor. Now you are ready to chain piece your bundle of strips together. 

Example:  1 bundle of 6 sets = 12 strips
                  12 strips chained 2 together = 6 strips
                   6 strips chained  2 together = 3 strips
                   3 strips chained together = 1 strip 1.75 by 16 linear yds. There is no need to back stitch the strips as you chain. The small stitching is adequate to hold the strips together both for rolling and crocheting.  Just be sure the overlap is enough so the pieces will not pull apart.
At the end of each chained group clip the strips apart and lay in your lap.  Pull a strip from each side of your lap and match ends as you did in the first round of chaining.

Repeat until you have one long strip.

Now we are really ready to try out the 4T-SSR.


 #1.  Attach the strip...right side out...to the tube with a straight pin making sure it is above the strip so you can remove it when finished rolling.
#2.  Gently stretch the strip out with bottom edge touching the lid lip.  It is easy to hold the strip between two fingers so it can slide through without twisting.  Notice the pile of stripping below...this distance allows for the strip to straighten out and unfold as you roll.
#3.  Turn the handle on the Swift to begin rolling.  Brace your elbow against your side to maintain level rolling and tension on the roller.
#4.  At the end of rolling...remove the clips and the straight pin and slide the roll off the tube.
Tie and Label
Be sure and maintain the center as it slipped off the Toilet Tube!!
Why?
So it will fit on the 4T-SSR Stand!!!

1/2/17

Round and Round Rag Rugs

As it happens after a year of stripping fabric yardage, clipping, trimming and collecting scraps...my bins 'runneth over and over and over'.  And since I can't or won't simply throw them away, I recycle, recycle, recycle!  Clippings and trimmings are recycled as stuffing for 'Dog Beds'.  Strippings!!!! My favorites!!!!  I love making something out of leftovers, leftovers, leftovers!!!

So, as 2016 neared it's end, a Bin Binge began with separating and bagging the clippings and trimmings from the strippings.  Holy Bags of Scraps, Batman!, there was stuffing for more dog beds than I have dogs.  Not to worry...family dogs found new beds under their Christmas Trees.

As for the Strippings....several days were spent stitching them together end to end and rolling them into fabric balls and jelly rolls.  What fun making pot holders, microwave bowl warmers (will show them later) and rag rugs.  This round of rag rugs done in the round, but not necessarily round.  Yep, a giant size 'Q' crochet hook and yards and yards of strips makes crocheting round and round for several hours a fun and productive time.  At the end of the last round...here are some of the 'Round and Round Rag Rugs'....